Getting Started
Now that stoQ is installed, getting up and running is extremely simple. stoQ can be run a few different ways, depending on what your requirements are.
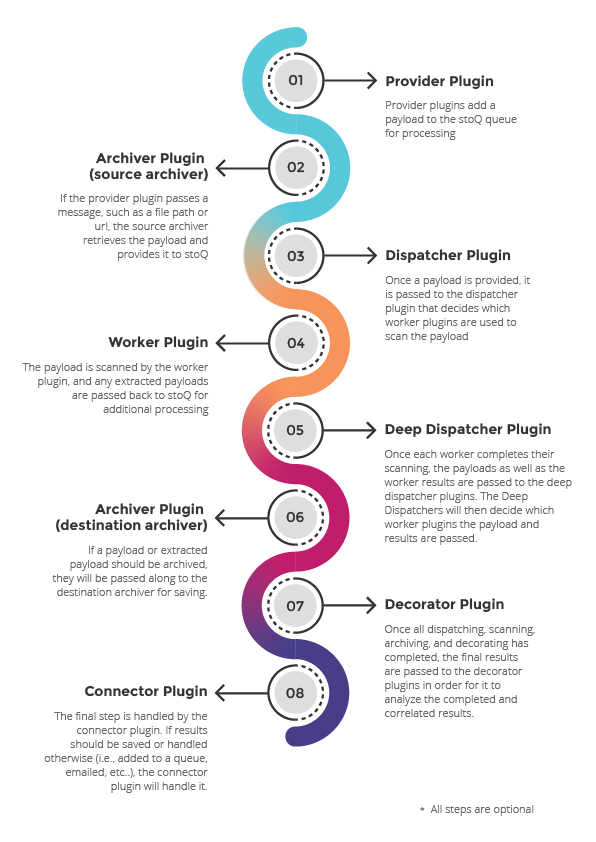
Workflow
Configuring stoQ
stoq.cfg
stoQ’s configuration file is not required, but does offer the convenience of overriding the
default configuration. An example configuration file can be found
here. By default, stoQ will
look for stoq.cfg in $STOQ_HOME if running from the command line, or $CWD if being
used as a library.
Plugin options may also be defined in stoq.cfg. More information on how to configure plugins in stoq.cfg can be found in plugin configuration.
$STOQ_HOME
When using the stoq command, stoQ will default to using $HOME/.stoq as it’s home directory.
This path is important as it is used as the default path for plugins and configuration files.
You can easily override this by setting the $STOQ_HOME environment variable. For example,
we can set stoQ’s home directory to /opt/stoq like so:
$ export $STOQ_HOME=/opt/stoq
Now, stoQ will look for plugins in /opt/stoq/plugins and the stoq.cfg configuration
file in /opt/stoq/stoq.cfg.
One thing to note is, $STOQ_HOME is only valid when using the stoq command. If you are
using stoQ as a library, the default path will be $CWD.
Running stoQ
The easiest way to get started is by running stoQ from the command line. There are two modes available, scan and run. Before we get into what each more is used for, let’s see how installed plugins can be listed.
List Plugins
Installed plugins can be easily listed by using the stoq command:
$ stoq list
stoQ :: v2.x.x :: an automated analysis framework
-------------------------------------------------
xdpcarve                      v2.0.0     Carve and decode streams from XDP documents
stdout                        v2.0.0     Sends content to STDOUT
rtf                           v2.0.0     Extract objects from RTF payloads
hash                          v2.0.0     Hash content
dirmon                        v2.0.0     Monitor a directory for newly created files for processing
vtmis-search                  v2.0.0     Search VTMIS API
peinfo                        v2.0.0     Gather relevant information about an executable using pefile
javaclass                     v2.0.0     Decodes and extracts information from Java Class files
filedir                       v2.0.0     Ingest a file or directory for processing
yara                          v2.0.0     Process a payload using yara
decompress                    v2.0.0     Extract content from a multitude of archive formats
ole                           v2.0.0     Carve OLE streams within Microsoft Office Documents
iocextract                    v2.0.0     Regex routines to extract and normalize IOC's from a payload
mraptor                       v2.0.0     Port of mraptor3 from oletools
trid                          v2.0.0     Identify file types from their TrID signature
smtp                          v2.0.0     SMTP Parser Worker
exif                          v2.0.0     Processes a payload using ExifTool
pecarve                       v2.0.0     Carve portable executable files from a data stream
swfcarve                      v2.0.0     Carve and decompress SWF files from a data stream
Scan Mode
Scan mode is designed for scanning an individual payload from the command line. This is especially useful for lightweight tasks or one-off scans.
Let’s get started. In this example, let’s simply generate the MD5, SHA1, and SHA256 hashes of a file.
First, let’s make sure we have the required plugins installed:
$ stoq install --github stoq:hash
Now, let’s run stoq with the hash plugin:
$ stoq scan /tmp/bad.exe -s hash
{
    "time": "...",
    "results": [
        {
            "payload_id": "0acfdfcf-f298-4950-96d2-13e3f93646b5",
            "size": 507904,
            "payload_meta": {
                "should_archive": true,
                "extra_data": {
                    "filename": "bad.exe"
                },
                "dispatch_to": []
            },
            "workers": [
                {
                    "hash": {
                        "sha256": "47c6e9b402324ea6c54dd95ad3fdf4b48b18775053b105e241a371a3731488c0",
                        "md5": "16d9f6e5421d99beb46d7ab1500c1799",
                        "sha1": "9e6414bf28a2c98fbd13172817db80380c5eeb6a"
                    }
                }
            ],
            "archivers": {},
            "plugins_run": {
                "workers": [
                    [
                        "hash"
                    ]
                ],
                "archivers": []
            },
            "extracted_from": null,
            "extracted_by": null
        }
    ],
    "request_meta": {
        "archive_payloads": true,
        "source": null,
        "extra_data": {}
    },
    "errors": {},
    "decorators": {},
    "scan_id": "5699d5ac-df3b-4ba1-bb38-296813d14d19"
}
Great, now we’ve generated the needed hashes; but stoQ allows us to do way more
than just generate hashes. Let’s also tell stoQ to use the peinfo plugin.
First, let’s make sure the plugin is installed:
$ stoq install --github stoq:peinfo
Ok, now let’s scan the payload again, but this time we will use both plugins:
$ stoq scan /tmp/bad.exe -s hash peinfo
{
    "time": "...",
    "results": [
        {
            "payload_id": "38cb070d-c9e8-48be-84d9-6ee612489fe8",
            "size": 507904,
            "payload_meta": {
                "should_archive": true,
                "extra_data": {
                    "filename": "bad.exe"
                },
                "dispatch_to": []
            },
            "workers": [
                {
                    "hash": {
                        "sha256": "47c6e9b402324ea6c54dd95ad3fdf4b48b18775053b105e241a371a3731488c0",
                        "md5": "16d9f6e5421d99beb46d7ab1500c1799",
                        "sha1": "9e6414bf28a2c98fbd13172817db80380c5eeb6a"
                    }
                    "peinfo": {
                        "imphash": "6238d5d3f08e2b63c437c2ba9e1f7151",
                        "compile_time": "2013-04-20 10:50:10",
                        "packer": null,
                        "is_packed": false,
                        "is_exe": true,
                        "is_dll": false,
                        "is_driver": false,
                        "is_valid": null,
                        "is_suspicious": null,
                        "machine_type": "IMAGE_FILE_MACHINE_I386",
                        "entrypoint": "0x32dc0",
                        "section_count": 5,
                        [...TRUNCATED...]
                }
            ],
            "archivers": {},
            "plugins_run": {
                "workers": [
                    [
                        "hash",
                        "peinfo"
                    ]
                ],
                "archivers": []
            },
            "extracted_from": null,
            "extracted_by": null
        }
    ],
    "request_meta": {
        "archive_payloads": true,
        "source": null,
        "extra_data": {}
    },
    "errors": {},
    "decorators": {},
    "scan_id": "43f3210b-b4ce-41e5-b39a-5fb8dbbc45ac"
}
Now, you’ve run the payload with two different plugins simply by adding it to your command line. As you use stoQ, you will see the power this affords you. This is especially true when you start delving into some of the more advanced use cases. There are quite a few other command line options, we’ve only just scratched the surface. For more command line options available in scan mode, just run:
$ stoq scan -h
Run Mode
Run mode is similar to scan mode, but is meant for handling multiple payloads or for long running tasks. This mode requires the use of a provider plugin.
For this example, we will monitor a directory for new files. When new files are created, the plugin will detect this and send the payload to stoQ for scanning. Chances are we won’t want the results to simply be displayed to the console, so we will also save the results to disk.
First, let’s make sure the required plugins are installed. Let’s start with the dirmon
plugin. This plugin monitors a directory for newly created files:
$ stoq install --github stoq:dirmon
Now, time to install the filedir plugin. This plugin will save the results to disk:
$ stoq install --github stoq:filedir
We’ll monitor the directory /tmp/monitor for this example and save our results to
/tmp/results. Let’s create these directories:
$ mkdir /tmp/monitor /tmp/results
Since we already have the hash and peinfo plugins installed from the scan mode
example above, let’s use them for scanning the payloads.:
$ stoq run -P dirmon -C filedir -a hash peinfo \
    --plugin-opts dirmon:source_dir=/tmp/monitor \
    filedir:results_dir=/tmp/results
Now, let’s copy bad.exe into the monitor directory:
$ cp /tmp/bad.exe /tmp/monitor
Ok, stoQ should have detected bad.exe was created in /tmp/monitor and then scan the
content with the hash and peinfo plugins, then save the results to /tmp/results.
Let’s take a look:
$ ls /tmp/results/
1f168f68-1c19-46f9-9427-585345a6fe24
Great! We have successfully monitored a directory for new files, scanned them with two plugins, and then saved the results to disk. Again, we’ve only scratched the surface as to what stoQ can do. For more command line options in run mode, simply run:
$ stoq run -h
Plugin configuration
Plugin configurations may be defined in several ways, see plugin configuration.
RequestMeta Options
RequestMeta options sets metadata associated with the initial request stoQ receives. This is useful when certain metadata, such as the source name of the payload, must be saved alongside the results of the scan.
There are two command line options avaiable for RequestMeta.
--request-source--request-extra
To set --request-source simply add the argument to the stoq command:
$ stoq scan [...] --request-source my_mail
{
    "results": [
        {
            "payload_id": "27774a9a-5a03-4d59-b51b-37583683b666",
            [...]
        }
    ],
    "request_meta": {
        "archive_payloads": true,
        "source": "my_mail",
        "extra_data": {}
    },
    "errors": {},
    "time": "...",
    "decorators": {},
    "scan_id": "e107f362-0b40-455e-bfef-da7c606637ca"
}
Additionally, extra data may be added to RequestMeta by using the --request-extra command
line argument. This option requires key/value pairs separated by an =:
$ stoq scan [...] --request-source my_mail --request-extra server=mail-server-01 postfix=true
{
    "results": [
        {
            "payload_id": "27774a9a-5a03-4d59-b51b-37583683b666",
            [...]
        }
    ],
    "request_meta": {
        "archive_payloads": true,
        "source": "my_mail",
        "extra_data": {
            "server": "mail-server-01",
            "postfix": true
        }
    },
    "errors": {},
    "time": "...",
    "decorators": {},
    "scan_id": "e107f362-0b40-455e-bfef-da7c606637ca"
}
Additionally, RequestMeta may be defined when scanning a payload using a Stoq object
>>> from stoq import Stoq, RequestMeta
>>> s = Stoq()
>>> request_meta = RequestMeta(source='my_mail', extra_data={'server': 'mail-server-01', 'postfix': True})
>>> s.scan(b'this is a test payload', request_meta=request_meta)

